Have you ever uploaded something so brilliant on Facebook, but then realised moments later that people couldn’t share it? Whether it’s an adorable cat pic, a family reunion, or a service pitch for your business, we’re here to explain how anyone can share your content on their Facebook page!
Our simple and swift tutorial will teach you how to make any post shareable, regardless of whether you aim to configure ahead of hitting publish or even on posts you’ve already posted on your page.
Fun Fact: the share command arose from the necessity to create connections that are effortless. Back in the early days of the digital community, sharing posts seemed like passing notes in class – a bit clumsy and not always effective. Facebook revolutionized this with a simple button.
Why keeping your Facebook posts under wraps might be holding you back
Keeping all your Facebook posts just for your close circle might be a bit of a missed opportunity, especially for the big stuff in life. Sure, it’s totally okay to keep some posts just for friends and family – we all have those personal moments we want to share with just a select few.
But think about those big events, like your dream wedding or that exciting moment when you’re opening your new restaurant. Making these posts public and shareable can really work wonders! It’s like throwing open your doors and inviting the whole neighbourhood to celebrate with you. Your friends can easily share your post, spreading the word far and wide.
Imagine more people discovering your awesome new restaurant, or more friends pouring in love and congratulations for your big day. So, while it’s great to keep some things close to your heart, going public on Facebook now and then can really help spread joy and news to a much bigger crowd!
Preparing your Facebook posts before posting
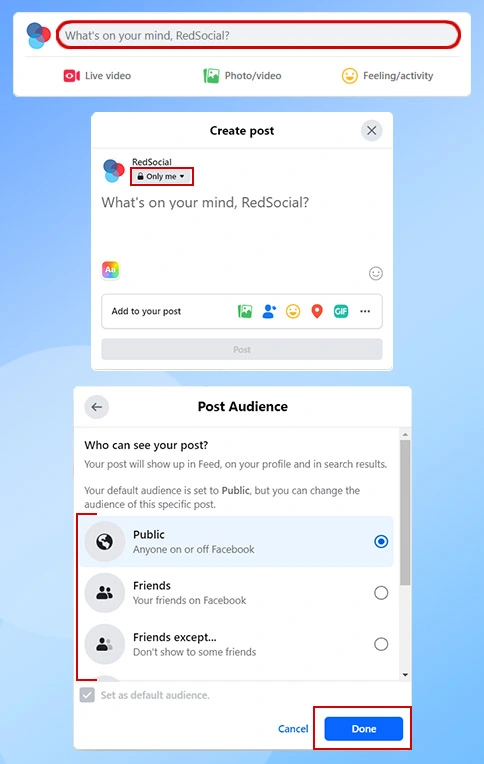
- Open Facebook
- Initiate a new post: Press ‘What’s on your mind?’ at the top of your feed.
- Detect the privacy settings: Underneath your name, you’ll see a button indicating the current privacy settings.
- Decide on your audience: Cherry-pick who you want to see the post. You have choices such as ‘Public’, ‘Friends’, ‘Friends except…’, ‘Specific friends’, ‘Only me’, or ‘Custom’ (available on desktop).
- Post and share: Upon arranging your attendees, click ‘Post’
How do I make a Facebook post shareable after posting?
On your browser:
Locate your entry: Find the post you want to modify.
Access post options: Click on the three dots situated in the upper right corner of the postbox.
Adjust audience: Opt for ‘Adjust Audience’ from the dropdown menu.
Determine visibility: Pick the new visibility preference for your post.
Save modifications: Select ‘Done’ to apply the updated post settings.

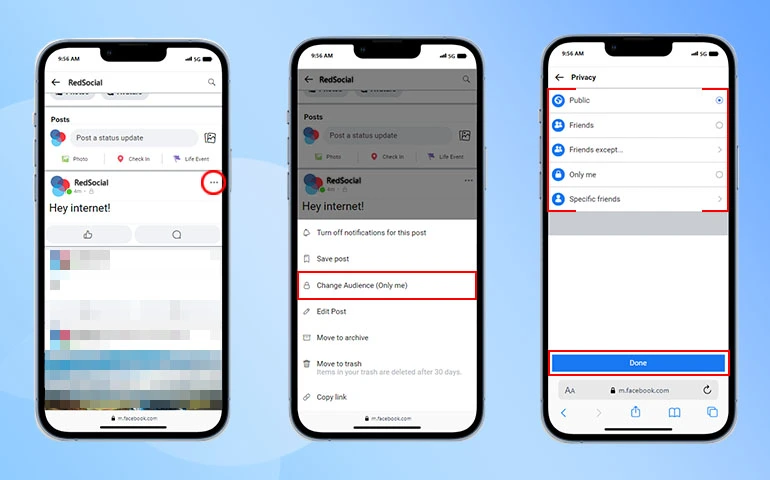
On mobile:
Find your entry: Navigate to the post within your FB mobile application.
Open post configuration: Tap the three dots located in the upper right corner.
Modify privacy: Choose ‘Modify Privacy’ from the menu options.
Define visibility: Opt for the desired visibility setting.
Confirm changes: Tap ‘Done’ to validate your adjustments.
Your publication has been released on Facebook and is now available to be shared and viewed by all users within the visibility settings you have chosen.
Adjusting public settings for your upcoming Facebook posts
To ensure your future posts are always set to ‘Public’:
Open menu: On mobile, press the three horizontal lines, on the web, press your profile picture top right corner.
Navigate to settings & privacy: This is your command center.
Select settings: Here’s where you can tweak your FB experience.
Adjust post settings: Navigate to ‘Audience and Visibility’, then ‘Posts’.
Set default visibility: Click ‘Who can see your future posts?’ and choose ‘Public’ to make your future posts ready for the widest audience

Final concluding remarks
All set! Your future Facebook posts are now perfectly tailored to reach the widest audience possible. It’s time to start sharing, and if you’re looking to give your posts and extra boost you can also buy Facebook shares on our website!
With this guide, you’ve transformed from a regular Facebook user to a savvy digital navigator. You’ve mastered the skill of making your posts shareable, adding a touch of brilliance to your Facebook presence.