With 3 billion monthly users on Facebook, you may likely be tagged by a random stranger, bot account, or even those creepy accounts. Managing them is crucial to keep your profile clean and your personal information secure. You can be linked to various content types which can lead to privacy risks. This guide outlines how to remove them effectively, whether on mobile or desktop. Following these instructions helps ensure that only content you approve appears on your timeline, safeguarding your professional image.
Tags on Facebook
Tags serve as links connecting profiles to specific types of content, influencing what appears on a user’s feed based on privacy settings. They increase engagement by notifying people when they appear in others’ content.
Types of Tagging:
Photo Mentions: These connect your profile to images, with visibility, potentially visible to people outside your friend circle.
Post Mentions: These link to textual updates and may expand who can see your involvement in a post.
Location Tags: Indicate your presence at a specific location, with visibility governed by the particular post’s settings.
Reasons to Remove Tags
There are several important reasons why Facebook users might choose to remove tags. First, for professional image maintenance, it’s crucial to ensure that your public profile does not display inappropriate content that could negatively affect your career or how potential employers view you. Secondly, they often lead to spam or irrelevant content appearing on your feed, cluttering it with items that do not pertain to you directly. Lastly, removing mentions enhances personal privacy, as it prevents unwanted disclosure of your location or activities that you may not wish to share publicly. If they are not managed, there could be unintended consequences such as impacting job prospects or straining personal relationships due to the portrayal of an inaccurate or undesirable public image. Thus, regular oversight of tags is vital for maintaining a positive online presence.
How to Remove a Tag on Facebook Mobile
To delete a tag from using the app, you can follow a straightforward process. After opening the app, navigate to your profile by tapping the menu icon, located at the bottom right on iOS or top right on Android, and then select your name. To locate the marked content, either scroll through your feed or visit the ‘Photos’ section, then ‘Albums’, and finally ‘Photos of You’. To delete it, tap the three dots on the upper right corner of the post, choose ‘Remove tag’ for photos, or ‘Find support or report post’ followed by ‘Remove tag’ for other posts. Confirm the removal when prompted, and the content will no longer be visible on your page. Now you can control your visibility, keeping your timeline reflective of your current preferences. Another strategy to keep your timeline reflective would be to buy Facebook followers and allow more users to engage with the high-quality content you share.

How to Remove Tags on Facebook All at Once
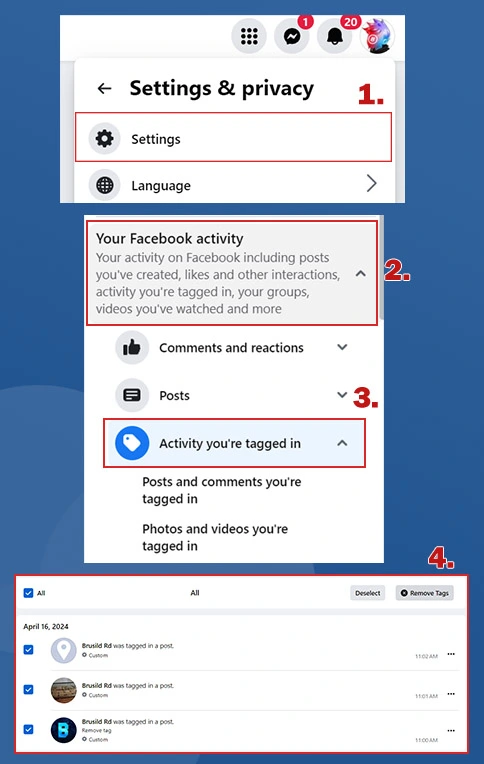
For those looking to quickly untag themselves from multiple posts, Facebook’s desktop interface offers an efficient solution for bulk removal. Click your profile picture at the top right and select ‘Activity Log’. Within the Activity Log, use the ‘Tags’ filter on the sidebar to view all the posts you are mentioned in. To erase multiple ones, select the checkboxes next to each item you want to clear yourself from and click the ‘Remove Tags’ button located at the top of the list. Confirm your choice when prompted to finalize the removal of these mentions. This process helps you maintain a cleaner feed.
For a more detailed and thorough guide, you can check out Facebook’s Help Article.
Tips for Efficient Tag Management
To effectively manage mentions, regularly check your Activity Log for any of them you might want to erase. You can adjust your settings by heading to Settings & Privacy, then to Settings, and finally to Profile and Tagging, where you can optimize the settings yourself. For added control, enable the Timeline Review feature, which lets you approve mentions before they are visible on your timeline, ensuring that only the content you approve is displayed on your profile.
Wrapping Up
Managing your tags is crucial for maintaining a secure and professional online presence that accurately reflects your identity. Proactively managing your tags improves your privacy and the quality of content linked to your name. Interested in further boosting your profile? Explore our Facebook page likes services to increase your visibility and engagement. Make a move today to ensure your profile is not only organized but also showcases the best version of yourself.